Screen printing or silk screening is also known as serigraphy. The term serigraphy is derived from both Latin “sericum” (silk) and Greek “graphein” (to write or draw). The process came into favor in first century China and is now considered one of the most versatile and inexpensive ways to print multiple copies of the same image.
The screen printing process works well with both fabric and paper. Screen printing on paper was popularized by American artists including Andy Warhol and Roy Lichtenstein.
Here are the basic steps for a simple one-color screen print on paper:
1. First, create your original, black and white artwork, leaving plenty of negative space around your image. The purpose of the solid black areas of the art are to block out light.
2. Transfer your final artwork to a clear transparency sheet by printing it through a laser printer.

Try making a simple drawing with thick lines for your first screen print, before venturing into art that is more complicated.
3. Prepare your frame. You can purchase a ready-made screen printing frame in a variety of sizes or make your own by stretching and stapling a length of multifilament polyester tightly to a wooden frame.
4. Coat the screen of your frame in emulsion by pouring a bit of emulsion on one side and using a squeegee to spread it across the screen. The emulsion coverage should be larger than the image you’re printing. Flip the frame and spread the emulsion that’s come through the screen onto the other side. Repeat until you have a nice, smooth layer, set on blocks, and dry in a dark room.
5. Once the emulsion is dry—and you’re still in the dark room—place your transparency face down on the screen, making sure your drawing is located in the emulsion-covered area, and is both centered and square. Tape down the transparency or cover with a sheet of clean glass to keep your image from curling when exposed to light.
6. “Burn” your image into the screen by exposing the screen to a light source with at least a 250-watt bulb angled at the screen and placed roughly 12” away. The white areas of your image will allow the light to pass through, hardening the emulsion. The black areas will prevent the light from coming through, so the emulsion beneath those areas of your image will remain liquid. This hardening process takes 25 minutes or more. Expose your screen to a light source for too long and risk the light penetrating through the dark areas of your image; too little and the emulsion won’t harden where you want it to.
7. When the emulsion is hard, remove the glass and transparency and rinse the emulsion from the image area of your screen with cold water using a sprayer. Scrub any emulsion stuck to the image portion of your screen with a toothbrush. You should see that your image transferred onto the screen.

Once the image is transferred onto the screen, you will see the inverse on the screen. The black lines are now white; the white areas are now black. If you have type in your image, lettering will be reversed on the screen as well. The black areas will block the ink; the white areas will let ink through to the paper.
8. Once the clean screen is dried, cover any exposed parts of the screen where there is no emulsion or image with tape to “frame” your image area and protect it from the ink.
9. Place your frame, screen side down, on top of your paper, making sure it’s square and centered.
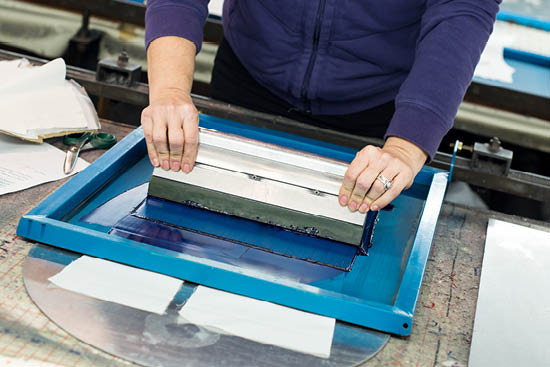
10. Pour some ink in a horizontal line at the top of your frame and use a clean squeegee to pull the ink down over the screen, as seen in the image below. This will transfer the ink through the screen onto your paper. Repeat until you’re sure the ink has transferred through the screen.

Pulling ink down the screen to transfer through to paper.
11. Carefully lift the screen to reveal your print. While your paper is drying (screen printing ink dries rather quickly) move on to the next paper you’ll be printing with your screen or, if you’re done, use your squeegee to scoop any excess ink back into the ink jar, and use emulsion remover to clean your screen.
Screen printing takes some practice, but once you’ve mastered the basics, you can experiment with adding a second layer of imagery or color to your paper by creating another screen and printing it on top of an existing print.
Have you tried screen printing? Do you have any tips to share? Let us know in the comments below.


Leave a Reply