
Whether you’re mounting student work for an upcoming art show, framing your own pieces, or simply doing a bit of decorating around the house, knowing how to cut a mat is a critical skill for an artist. That’s why our 101 Art Series is here to help you with basic mat cutting skills.
We won’t say it’s simple, but with some practice, you can master the art of mat cutting!
Mat Cutters and Alternative Options
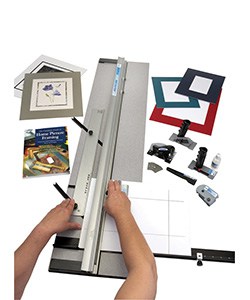
If you find yourself doing a lot of cutting, you might want to invest in a mat cutter. There are several types available, including hand-held cutters designed to be used with guide rails, base-board mounted cutters, and heavy-duty mat cutters with squaring arms.
Shop Mat Cutters & Accessories
Mat cutters are relatively easy to use. Set the attached mat guide to the size of the border you want, then slip each side of your mat into the cutter and mark the border edge with a pencil. You’ll then place the cutter into the guide, cut from the first edge to the next, turn, and repeat until the center of your mat is cut away.
If you’re not ready to purchase a mat cutter or need to make a mat now and don’t have a cutter, here’s what you’ll need:
- Sharp straight blade—an Exacto knife or box cutter with a fresh blade
- Straight-edge ruler
- Pencil
- Protective cutting surface
- Artwork
Step 1: Determine Mat Size for the Final Frame
If you’re planning on framing your piece, consider the size of the frame and the size of the finished mat that will fit inside. Keep in mind that most borders are between 1-1/2 to 3 inches. At times, you also see framed pieces with extremely large borders, most times with the bottom border, to offset the art in a non-traditional manner.
Step 2: Start Cutting the Mat
Next, place your protective cutting surface down on a solid, level table or countertop. Wipe the surface with a dry cloth to make sure it’s clean before placing your mat on top of it, and cut the outside dimensions of your mat to the appropriate size, if necessary. The cardboard insert that comes in most frames can serve as a helpful template.
Step 3: Measure Twice, Cut Once
Now you will use your straight-edge ruler to measure your art piece horizontally and vertically. The old adage measure twice, cut once really comes into play here. Note your final measurements on a piece of scrap paper and follow these steps:
- Subtract the width of the piece from the width of your mat and divide by two. This is how much space will be on each side of your mat.
- Use your straight-edge ruler to mark that distance from the outer edge of the mat in several places, then use the straight edge to draw a light pencil line connecting the markings.
- Repeat this process, calculating the size of the border at the top and bottom of your piece by subtracting the height of the piece from the height of the mat and dividing by two. Then mark the top and bottom borders of your mat with a pencil.
- Press your blade into the four intersections of your mat using your straight-edge ruler.
- Line up your straight-edge ruler with the first pencil line on your mat, insert your blade into the top cut mark, press firmly, and pull the blade along the ruler until you meet the next cut mark.
- Repeat until all four lines are cut, and press the centerpiece out of your mat.
- Check that each corner is cut clean, and use your blade to scrape any scraps away.
Step 4: Mounting
Whether you’ve used a mat cutter or cut the mat yourself, once the centerpiece is out of your mat, you’re ready to mount your piece. Turn your mat over and place the piece face down and centered in the open hold. Use archival tape to secure each side on the back side of the mat. Flip your mat and check your work. Adjust as needed until the piece is perfectly centered and level within the mat.


Leave a Reply