When we think of Hawaii, one of the first things that comes to mind is the Hawaiian or Aloha shirt. This shirt’s origin dates back to the 1920s but was made famous after WWII when US Servicemen brought them home. And later, as tourists travel to Hawaii, the shirt was the perfect souvenir to bring home. The imagery and colors reflected the islands’ flora and fauna, depicting the uniqueness of the environment.
The people of the Hawaiian Islands, along with many of the Pacific Islands, made a fibrous cloth called Tapa cloth. Each island/culture had a different name for the cloth. This cloth was traditionally made from the inner bark of trees. The bark was beaten by hand over hard wood into sheets until it was paper thin, allowing it to be pieced together to make larger portions. The process of beating the bark into cloth was a communal activity. Early explorers noted the first sound they often heard when landing on an island was the beating sound made by the “bark cloth workers” along with their singing. The mulberry tree was the main source of the inner bark.
The cloth was used for clothing, bedding, ceremonial robes, and wall hangings. Very early Tapa patterns consisted of geometric and line designs usually created in shades of brown and black. The patterns were applied using plant and nut dyes, along with ash. Studying bark cloth has given historians insights into the inhabitants of the Pacific Islands, showing us how their daily and ceremonial clothing changed through the years. Many examples of Tapa cloths exist today in museums, as early explorers could easily bring rolled-up pieces home with them.
As clothing and housing needs changed, so did designs. First, we see the introduction of color into the designs, followed by a change to more animal, flora, and fauna design patterns as well as the traditional geometric patterns. The geometric and natural patterns were woven together to create the Tapa cloths we see today.
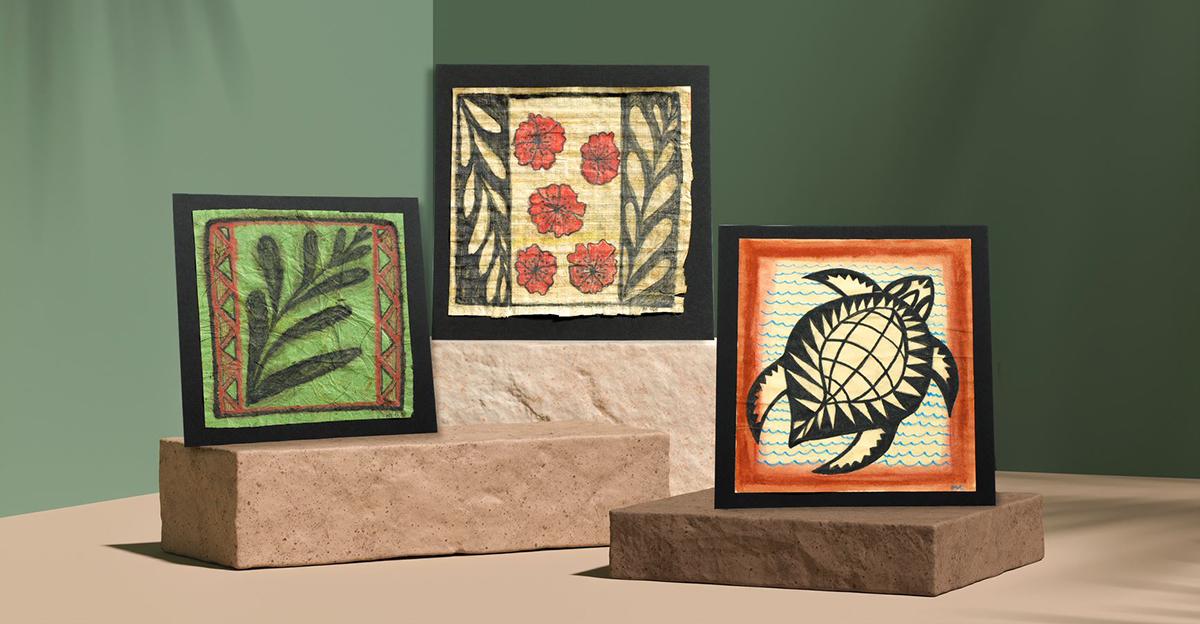
The Hawaiian Islands have an endless number of natural elements to pick from, both on land and in the ocean. Start this lesson by having students explore the natural habitat of the Hawaiian Island and research how these elements found their way into the Hawaiian Tapa cloths. Students should create sketches selecting a central element and border elements for their cloth. They can use the items found in their exploration of the islands or create elements that reflect the habitat in which they live. We do not have access to bark cloth but there are many papers today that offer some of the same textures and feel of bark cloth, such as mulberry paper, made from the same trees that the inner bark for bark cloth comes from. Papyrus and banana paper are two commercially-made papers that have the same texture and feel of bark cloth. Any natural paper will work for this project. Two of our favorites for this project are Manila paper (80lbs or higher) and the brown paper (see notes for how to use) found in shopping bags or packing material. Both are sturdy papers, with a nice tooth/texture and a color like bark cloth.
Any number of mediums can be used to apply designs. See lesson plan for more detailed information around design ideas and techniques. Consider using graphite pencils and crayons to recreate the natural colors originally created by using ash. Water-soluble crayons, pencils, and markers help to add additional color. When working at home, have students experiment with charcoal briskets to mimic the use of ash in creating their own Tapa cloths.
Tips & Ideas
- Brown paper shopping bags and packing material are a great substitute for bark cloth. After cutting out the shape wanted, crumble the paper. It can be used at this point or for extra softness, submerge in a bucket of water for a few minutes. Take out and lie flat before drawing or painting on it.
- Use a deckled or straight-edge ruler to cut out the shape desired. This torn edge will give the natural appearance of bark cloth.
- Experiment with charcoal briskets or pieces of burnt wood from a fireplace to draw the design mimicking the ash used by early island artists.
- Discussion Point: How does a communal activity benefit a community?
- Have fun watching the Disney movie Moana. Have students observe the island flora, fauna, and clothing patterns in the movie.
- Have a Hawaiian Luau Day to celebrate the completion of your students’ work.
Hawaiian Tapa Cloth Painting Objectives
- Participants will study the origins of bark cloth in the Pacific Islands.
- Participants will learn to identify patterns, shapes, and compositional features such as borders, asymmetry and symmetry, and plant and animal motifs.
- Participants will experiment with different mediums and patterns to create their own Tapa cloth.
View the Lesson Plan: Hawaiian Cloth Painting
More Multicultural Art Lesson Plans & Ideas
Want to try something else? Be sure to check out these other art lesson plans and view our Art Lesson Plan collection for even more.
Share Your Star Students’ Artwork and Enter for a Chance to Win $250!
We love student art! Give your students an opportunity to shine. Submit their artwork to be considered for our next Featured Student Artist and a chance to win a merchandise certificate worth $250 for the student and the teacher who inspired them. Original artwork from students of all grade levels is eligible and the online submission process is simple. Visit our Student Art page for details.
Mary Reilly
Mary Reilly received her BA with an emphasis in textile design from Mount Mary University in Wisconsin. She studied at the Wetterhoff Institute of Craft and Design in Hämeenlinna, Finland, as well as took numerous post-graduate courses in fine arts. Mary has over 15 years of experience with Sax Arts & Crafts, developing and shaping a national team of Art Consultants who have conducted art education and professional development workshops to elementary, middle, and high school art educators across the United States and Canada.
Read more by Mary Reilly
Nadine Dresbach
Nadine Dresbach received her Masters and Undergraduate Degrees in Art Education from Kent State University. She began her teaching career at Canton City Schools and Kent State University in Ohio. In 1995 she was hired by Sax Arts and Crafts as an Art Consultant and Category Sales Manager representing School Specialty at conferences and professional development sessions. Nadine also creates artwork and lesson plans for the company. Her other teaching experiences include instruction and Internship Supervisor for Winthrop University in Rock Hill South Carolina as well as work for the Rock Hill and Union County School Districts and St. Anne Catholic School.
Read more by Nadine Dresbach


Leave a Reply